
Simple Steps To Drawing
Force Diagrams
and
Motion Maps
Force Diagrams Click for Motion Maps
Drawing force diagrams is fairly easy in terms of taking a lot of time and making you think a lot. Here are a few easy to follow steps to help you in your studies.
Step 1:
Consider the Problem - take time to look at all of the details of the setup of the problem.
-Check to see if there is any Friction.
-Make sure to note what units all of the measurements are in.
-You probably want them to be the same if possible.
-Find the extent of the problem.
-What objects will be part of the diagram and which ones will not.
Step 2:
Converting - convert any necessary measurements to the desired unit(s).
-Make sure to look at what units the problem calls for..
-Force = Newtons.
-Mass = Grams, Kilograms, etc.
Step 3:
Drawing - there are two ways to draw force diagrams.
a) Quantitative Drawing - this method of drawing force diagrams calls for more precise measurements.
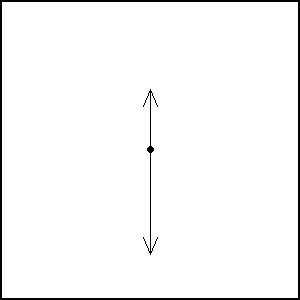
Ex: Here is a very simple force diagram to explain this.
>From this diagram one can assume that the forces are equal because they have the same mathematical value.
b) Qualitative Drawing - this method of drawing force diagrams deals with visual perception of the forces.
Ex: Here is another very simple diagram to explain this.
>From this diagram one can assume that the force above the object is significantly less in value, in fact close to half that of the force below the object (represented by the dot in the center of the square) simply by comparing their lengths.
Step 4:
Double Check - make sure that all of the forces are accounted for.
-Leaving out even one force on the diagram can have a completely different effect than if that missing force was there.
Motion Maps Click for Force Diagrams
Drawing motion maps is equally as simple as drawing force diagrams. In fact, it is almost the same thing all together.
Step 1:
Consider the Problem - refer back to Step 1 of Drawing Force Diagrams.
Step 2:
Make a graph in the form of a horizontal line with periodic time indicators.
Ex:
Here is an example of this.
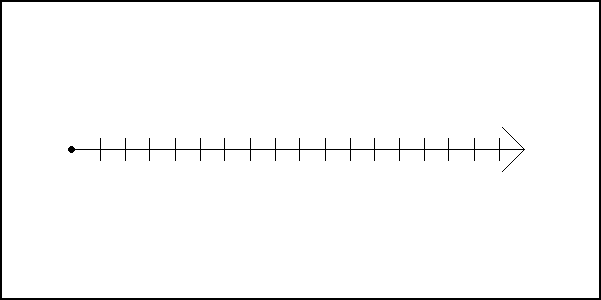
Note: The left end is the beginning of time during the experiment.
Step 3:
Draw Arrows - the arrows represent the all of the values in the experiment.
-If the values in the experiment were small at the beginning and larger at the end make the arrows at the beginning smaller.
Example:
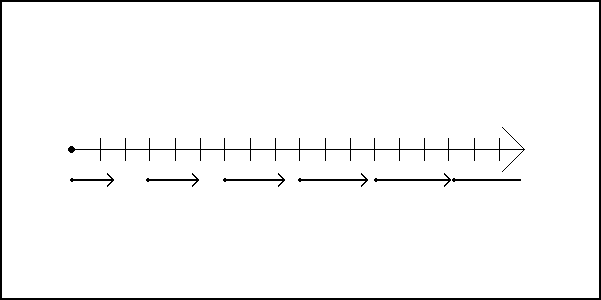
-Make sure that all of the arrows are proportional to the intensity of the measurement at the specified time on the graph.
Things like making Force Diagrams and Motion Maps can be boring or seem meaningless, but these things really can be used in the real world. Things like why a car crashed, or how safe a rollercoaster is can be found using these methods. Although some things may seem to have no meaning for you as an individual, you might end up having to use these things some day.
My Links Page
This page made by Ananda Trulley.
Just trying to make things a little simpler for the world.
Email me at AnandaTrulley@hotmail.com